

Photo by Christin Hume on Unsplash
Day 06 - Are my codes working or not? TTD can help
Discover test-driven development and Rspec for Ruby


Table of contents
As a developer, I have to always make sure my codes work no matter what happens. In order to do this, testing my codes repeatedly with irb or ruby test.rb is quite annoying.
What if we can set up some tests in advance and run them after every time you change your codes, then show you a descriptive error message if anything goes wrong? That's what we call 'test-driven development' (TDD).
What is TTD?
Test-driven development (TDD) is a software development process relying on software requirements being converted to test cases before software is fully developed, and tracking all software development by repeatedly testing the software against all test cases.
This is as opposed to software being developed first and test cases created later.
How can we apply TDD to our codes?
We could apply TDD by following TTD Cycle. Here are the 5 steps to reach test-driven development:
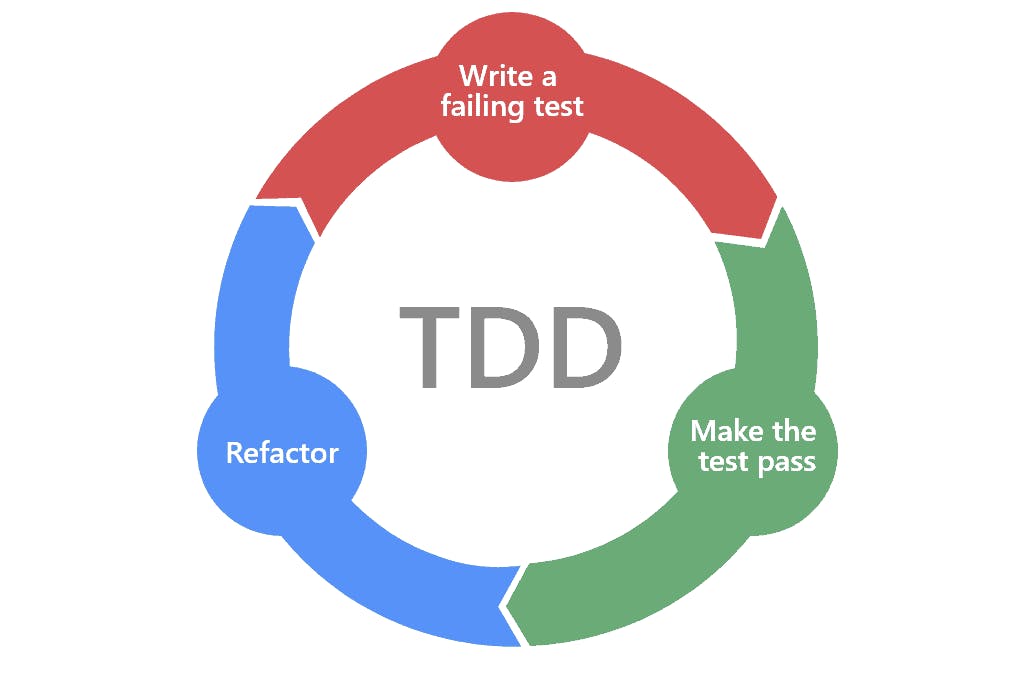
Step 1 - Add a test
In usual practice, we set up unit tests after developing our codes. In TDD, we do the oppose: we get started by writing a test that passes if the feature's specifications are met.
In this way, we can focus on user requirements before writing code to make sure we will be on the right path before entering the mud.
Sometimes, we might need help from use cases and user stories to understand what users actually need and specifications about the features they need.
Step 2 - Run all tests and fail for expected reasons
In this step, just run your tests to make sure the test harness is working correctly. And of course, all of them will fail for now.
But by doing this, it rules out the possibility that the new test is flawed and will always pass.
Step 3 - Write the simplest code that passes the new test
In this step, we should use the most direct and simplest way to get your tests passed. Even though you use inelegant or hard code, it's also acceptable. However, no code should be added beyond the tested functionality.
Don't worry that your codes now look awful, we will come back to them and make sure they are clean and tidy in Step 5.
Step 4 - Passing all tests
In this step, we revise the new code until they pass all tests. This ensures the new code meets the test requirements and does not break existing features.
Step 5 - Refactor
In the last step, code should be refactored for readability and maintainability. In particular, hard-coded test data should be removed. Running the test suite after each refactor helps ensure that no existing functionality is broken.
How to set up a test?
Rspec

To demonstrate, we will use Rspec.
It is a framework that allows us to set up testing in Ruby. The "R" stands for Ruby, and "Spec" is short for Specification.
A specification is a detailed requirement that our code should meet. Or more formally, it's an executable example that tests whether a portion of code exhibits the expected behavior in a controlled context.
Official website: https://rspec.info/
Documentation link: https://relishapp.com/rspec/rspec-core/docs
Step 1 - Initialise project and Rspec
First, we have to
make sure you have installed Ruby by running
Ruby -vcheck if Rspec is installed in your computer by entering
rspec -v. If no Rspec is found, you can install it by runninggem install rspec.create a new folder by running
mkdir your_project_nameandcdinto it
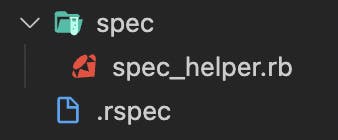
Second, you can initialise Rspec by running rspec --init . 3 files will be created automatically, which are spec folder with spec_helper.rb inside and .rspec .
And now, your project folder is ready for TDD!
Step 2 - Create a test
By following TDD cycle, we should create a test before diving into codes. For demonstration purposes, we will create a really simple method and a test for it.
Here is what the method will do in my design:
just simply return the input directly to user
Here is the code we need for our test:
describe Testing do
    let(:main){ Testing.new }
    context "#return_input" do
        it "should return true when the input is true " do
            expect(main.return_input(true)).to be true
        end
    end
end
Grouping in Rspec
The describe method creates an example group. Within the block passed todescribe you can declare nested groups using the describe or context
methods, or you can declare examples using the it or specify methods.
In this example, describe is used to nest the top level of grouping and there is one context group inside Testing. As for it , I wrote a message stating what will be tested inside the block.
Declaring Variables by using let
let defines a memoised helper method. The value will be cached across
multiple calls in the same example but not across examples.
In this example, I use let to memoise a Class for this test and call it inside it block.
Step 3 - Create a class
For the last step, we are going to create a class which contains all the functionalities we need.
In lib/testing.rb, we write a class by using the following lines:
class Testing
    def return_input(user_input)
        user_input
    end
end
Last but not least, we should import our Ruby file into the test before running it. In spec/testing_spec.rb :
require 'testing'
Step 4 - Run your test!
By running rspec in your working directory, your Ruby code should pass your test! You can now create your own test and get used to TDD.